Summary
Introduction
Oftentimes, things cross our path when we are least expecting them. No, I am not referring to a soulmate or the winning lottery numbers. I am talking about iOS notifications stored in private/var/mobile/Library/DuetExpertCenter/streams/userNotificationEvents/local.
These files can be extremely valuable as they may contain deleted information or information no longer found anywhere else on the device. Among the treasure trove of information that I found during my research were messages, social media notifications, financial transactions, backup status, Navigation information, AirTag notifications, battery events, and the list goes on and on.
So far, I have only found these files in iOS 15.x, so if you find them in other versions of iOS, please let me know.
File Structure
I first came across these logs by doing keyword searches. I quickly recognized the “SEGB” signature in the file, which I had seen referenced in John Hyla’s “Analyzing iOS Biome AppIntent Files” blog post. Even though the AppIntent files that he refers to in his post contain embedded bplists and protobufs, the files found in ‘userNotificationEvents” have a similar header.
(By the way, if you haven’t checked out his AppIntent parser, you should, because you could be missing on a lot of data.)
I have always enjoyed looking at things at a byte level to validate my findings, so my intent with this post is to torture... uhm... I mean share my finding with the forensic community.
(Disclaimer: The amount of test data I had access to was very limited, so feel free to share with me any findings. Like I always say, this is how we grow as a community.)
(Second Disclaimer: The terms listed below like "Notification Title", "Attribute Marker", etc., are terms that I am using in this blog post so it is easier for the reader to follow along, but it is not the official "Apple terminology".)
File Name
Just like the filenames for the AppIntent files, the file name for a User Notification Events log is a string of 15 digits that decode to a modified Apple Cocoa Core timestamp. Just divide this number by 1,000,000 (or simply add a “.” between the 9th and 10th digit) and convert. In my testing, the filename timestamp always corresponded with the creation date of the file.
For example, the filename of one of my test files was 671744232364441. Dividing this by 1,000,000, we have 671744232.364441. Converting this value into Apple Cocoa Core timestamp, we get GMT: Friday, April 15, 2022 7:37:12 PM.
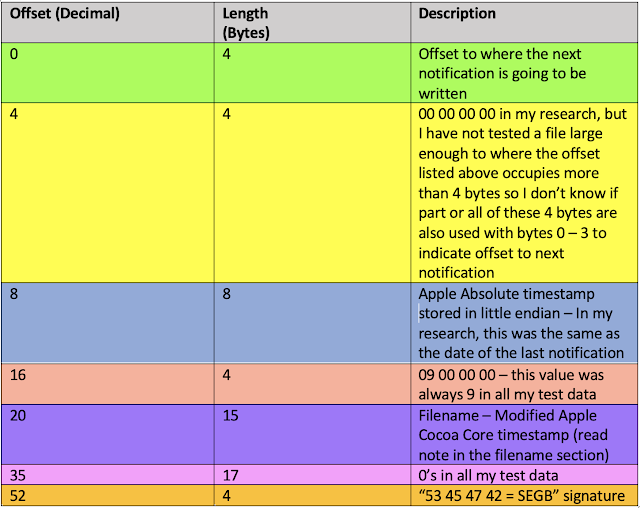
File Header
The following table shows a breakout of the 56 bytes that make up the header of this file.
I think the best way to understand the complicated structure of this file is to use an example.

The first 4 bytes, in Little Endian (0x 00 09 DE 68), represent the offset to where the next notification is going to be written. In this case, offset 646,760 in decimal. (highlighted in green in the screenshot)
The next 4 bytes (highlighted in yellow) have been 0x00 00 00 00 in all the files I looked at during my research, but I don't know if that is the case in every file.
Offsets 8-15 (highlighted in light blue) correspond to an Apple Absolute (Cocoa) timestamp stored in Little Endian. I used DCode to convert this: 4/22/2022 23:39:53 UTC. This timestamp correlates to what I'm going to refer to later in this article as "Date 1" and "Date 2" of the last notification of this post.
The next 4 bytes were hex 0x09 00 00 00 in all my test data. If you see any other values in these offsets please let me know.
Offsets 20 - 34 (highlighted in purple) indicate the filename, which as a reminder, is a modified Apple Cocoa Core timestamp that represents the creation date of the file.
The next 17 bytes (highlighted in magenta) were 0x00 in all my test data. If you have a different value on your data please reach out to me.
Offsets 52 - 55 (highlighted in orange) correspond to the infamous "SEGB" signature (0x53 45 47 42), which is characteristic of this type of files.
Notification "Records"
General Structure
The structure of each notification "record" reminded me in a way - by no means I’m saying it’s the same thing before any Windows fans jump at me - of NTFS and $MFT attributes. In any case, it brought me a lot of joy to manually parse and “color” them in my favorite hex editor. No, I am not being sarcastic, I think I’m one of the few human beings that enjoys manually going through attributes and parsing data runs.
But anyway, I digress...
Notification/Record "Headers"
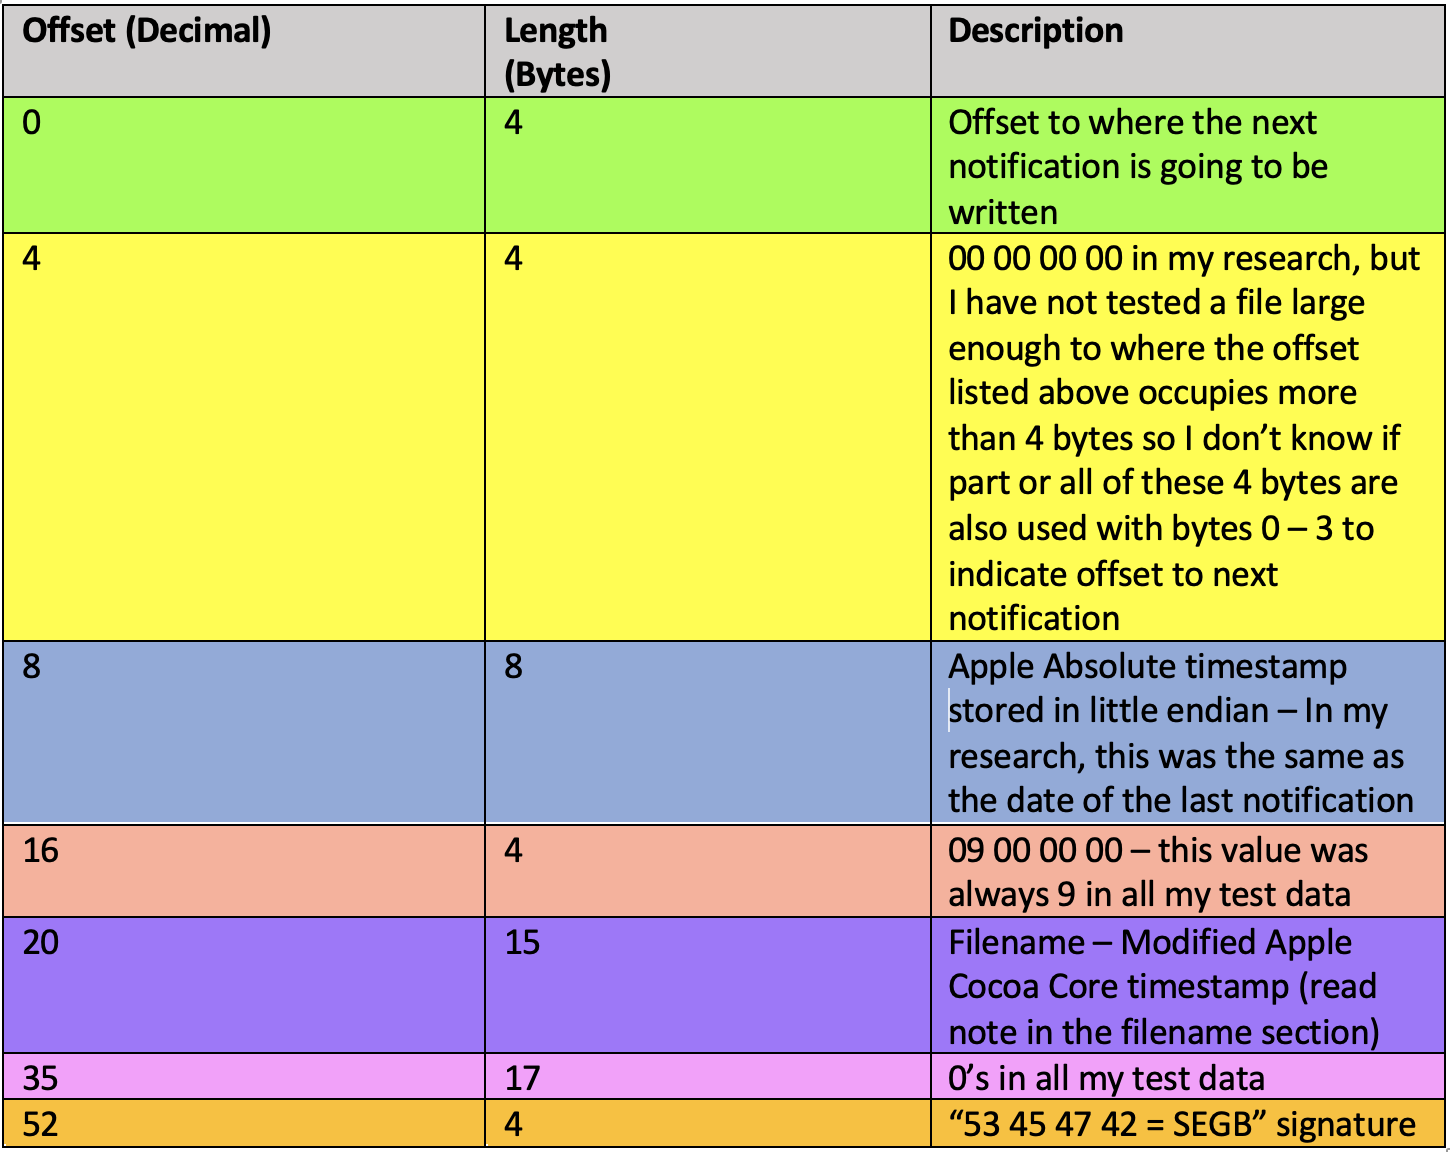
The first 32 bytes of each Notification is what I am referring to as the "notification header" or "record header".
The following table shows a breakout of the 32 bytes that make up the "notification header".

(1) Record Size: Each "notification header" starts with what appears to be the notification (content) size, stored in Little Endian. Start counting at offset 32 from the beginning of the notification header.
The next 4 bytes were 0x01 00 00 00 on all the records that had notifications/data and 0x03 00 00 00 on the records that were empty, so this field could indicate allocation status. (2) If you have any additional values in your data, please let me know.
The next 16 bytes represent 2 dates in Apple Absolute (Cocoa) time. (8 bytes each, stored in Little Endian). I am referring to these dates in this blog post as "Date1" and "Date 2". (3) Date 1 seems to be the same as Date 2 in all my test data, even in records that were empty. I will discuss timestamps a bit more in-depth shortly.
(4) Next is the actual “record” (Notification Data). This field is variable in length. I will cover this in more detail in the next section.
Notification records can only start in 8 byte boundaries, so you will see 0x00 from the end of the record until the start of the next.
Lets look at an example to make things easier... It is a Screentime notification, not as fun as parsing a social media DM for example but it saves me time from having to redact screenshots so it makes things easier for me. :)
In this example, we see the notification size is 0x00 00 00 FA, which is 250 in decimal (highlighted in green in the screenshot).
The allocation status is “01 00 00 00” (highlighted in yellow in the screenshot), which is consistent with the notification still being present in the log.
We then see "Date 1" (highlighted in blue in the screenshot) and Date 2 (highlighted in magenta) of 0xD1 22 FF 9F 23 06 C4 41, read in Little Endian (0x41C4 06 23 9F FF 22 D1). After unpacking this value as a double and converting to an Apple Absolute (Cocoa) timestamp (thank you Alexis Brignoni for coding this!), we get 4/17/2022 13:01:51 UTC.
By the way, the awesome Ian Whiffin (@BlakDouble) summarizes these and other timestamps in his "A Hundred Million Timestamps" blogpost.
The value of the next 4 bytes, 0xDD EE 49 E6 (highlighted in gray in the screenshot) is still to be researched, followed by “0x02 00 00 00” (highlighted in orange) that also needs to be researched. (Note: If you see any values here instead of “0x02 00 00 00”, please let me know.)
The next 250 bytes (highlighted in purple on the screenshot) correspond to the actual notification data. Remember, this value is variable and is determined by the first 4 bytes of the notification/record header (highlighted in green).
We also see 6 bytes of padding (0x00) to get to the 8 byte boundary (highlighted in black).
Notification Data
Like we discussed in the “Notification/Record Header” section, the data section is variable and is the actual section that reminded me in a sense of NTFS attributes. Just like $MFT records are comprised of a series of attributes, and some may or may not be present in all the records, something similar happens in these notifications: which fields are present depends on several variables, like the type of notification, app that created it, etc.
Right before each field, we find a type identifier or “attribute marker”, just like 0x10 00 00 00 would be the type identifier for the $Standard_Information attribute or 0x30 00 00 00 would be the type identifier for the $File_Name attribute in NTFS. After the attribute marker, the next byte (or bytes) represent the length of the field or attribute, followed by the actual attribute. This is a 10,000 feet overview, but we will discuss in detail shortly.
The table below shows the structure of a notification’s content. Please keep in mind that this research is a work in progress, so if you have any files that you can share with me I would truly appreciate it. Also, if you find any additional attributes that I have not listed, please share!

Let’s dive in…
I have yet to decipher what the first 3 or 4 bytes of the notification content represents. In most of the records, this was a 4 byte value, but some of the notifications had only 3 bytes between the end of what I am referring to as the notification header and “Date 3”, which I will discuss next. If you have any guesses as to what this field could be, or if you find less than 3 or more than 4 bytes here, please let me know.
The next 8 bytes of the record represent another date in Apple Absolute (Cocoa) time. (8 bytes, stored in Little Endian). I am referring to this date in this blog post as "Date 3". We will discuss more about timestamps later.
After the date, we find our first attribute marker, 0x12, which is the attribute marker for the notification “GUID”. This GUID is unique for each (different) notification. For example, you may have an SMS notification from “K9 Siri” (my coworker) saying “Hello mom, I am hungry, please bring bananas.” You could find this notification 3 times in each file, depending on the status of the notification (e.g. received, hidden, etc.). Each of these copies of K9 Siri’s message would have the same GUID. The next byte after 0x12 is the length of the GUID. In all my test data, these GUIDs were always 36 bytes in length, so this field was 0x24. If you find a different value here please let me know. After 0x24, sweep 36 bytes to obtain the notification’s GUID.
The next attribute marker is 0x1A, which is the attribute marker for the “Title”. Following the same structure we had with the GUID, we will find the length* of the attribute right after the attribute marker, followed by the actual content (in this case, the notification title). The "Title" field is optional (a notification does not need to have a "Title".
Next, we may find the 0x22 attribute marker. This is the attribute marker for the notification’s “Subtitle”. Note: A notification can have a “Subtitle” without having a “Title”… Apparently, the sky is the limit when it comes to options available when designing notifications for an app. *facepalm* The "Subtitle" field is also optional and follows the same attribute marker/length*/content format described above.
The attribute marker corresponding to the “Body” (or message) of the notification (0x2A) comes next, followed by the length* for this attribute and the content or body of the notification. It is important to know that a notification may or may not have a body (I will show an example of both types in the Examples section of this post.)
(See screenshot below for an example from my test phone, which shows an example of the "Title" and "Body" fields).

Next, we have attribute marker 0x 30 00 42, which is the attribute marker for the “1st bundle ID”. This is the Bundle ID of the app that generated the notification. Once again, it follows the same format: attribute marker (0x30 00 42)/length/content. This field was present in all my test data.
We then find an optional field, which varies depending on the app. I am very creative, so I named this field “Optional Text”. For example, if the message is a direct message sent via Instagram, the value of this field may be “direct”. Another example could be “chat<number>” if it is a group chat in certain apps, etc. The attribute marker for this field, if present, is 0x4A 00 52.
The next field is a “2nd bundle ID”. However, the tricky part of this is that the attribute marker for it changes depending on whether the notification has an “Optional Text” field or not. In other words, if attribute marker 0x4A 00 52 is present, the attribute marker for the 2nd bundle ID is 0x62. If attribute marker 0x4A 00 52 is not present, the attribute marker for the 2nd bundle ID is 0x4A 00 52 and it will follow the “1st bundle ID”. In all my testing, the 1st and 2nd bundle IDs were the same, but if you find a case where they are different, or where the notification is missing one or both bundle IDs, let me know.
The meaning of the next 20 bytes is still unknown and it is still in my “to do” list. So far, all the ones I have found start with: “0x70 00 78 02 80 01 …”. Please, let me know if you have any ideas of what these bytes may represent.
After these 20 bytes, there is another optional attribute. So far, when the notifications have this field, it is an “Apple ID” (phone or e-mail). The attribute marker for it is 0xA2 01, and it follows the same format we have been discussing (attribute marker/attribute length/attribute content). There can be more than one 0xA2 01 attributes (so far the maximum I have found is 2).
The value of the next 3 bytes (0x10 ## 19, where ## varies) has yet to be researched.
The next 8 bytes represent another Apple Absolute (Cocoa) timestamp, identified in this blog post as “Date 4”.
Next, we have the end of the notification, indicated by 0x28, followed by 0x01 or 0x00. (In other words, the notification ends with 0x28 00 or 0x28 01). The length of the notification, from the first byte after “0x02 00 00 00” (see Notification Header section) until 0x28 00 or 0x28 01 should match the length identified at the beginning of the header section. (Note: I have only seen 0x28 01 and 0x28 00 here, but if you see any additional values or have any insight as to the difference between what the two values means, please let me know.)
Attribute Length*
Parsing the attributes seemed straightforward: Find the attribute marker, convert the next byte from hex to decimal, and sweep that number of bytes... Until all of a sudden Alexis Brignoni and I realized that some of the “attribute lengths” consisted of more than one byte.
5/16/2022 Update!: It looks like attribute lengths are varints, thank you so much Alex Caithness (@kviddy) for pointing this out.

If you want to learn more about "varints", take a look at the following posts:
Lets Make a Varint, by Carl Mastrangelo
IndexedDB on Chromium by Alex Caithness
I'm still going to leave my “brainstorming process” here so you guys understand how we were able to find a solution that allowed us to shared what we had even if we did not have it all figured out. Feel free to skip this section and just go straight to the decoding examples, or to the next section of this post.
****"Brainstorming Process" when we were trying to figure out how to parse the attribute length****
We noticed that if the attribute content was 128 (0x80) bytes or more, the attribute length was determined by 2 bytes instead of one.
For example, if we are parsing the “Body” of the following notification:
Our initial thought process: 0xC8 follows the 0x2A attribute marker. We know that 0xC8 (which is 200 unsigned) is bigger than 0x80 (128, unsigned). Since the byte that follows 0xC8 is 0x01, we just sweep the 0xC8 bytes, starting with the byte after 0x01 (highlighted in blue in the screenshot). This case is simple enough…

However, things got a bit more interesting when the second byte after the attribute marker was 0x02. (I haven’t seen anything other than 0x01 and 0x02, but I am sure it is just a matter of time before Apple surprises me... again!).
“I have not failed 10,000 times. I have not failed once. I have succeeded in proving that those 10,000 ways will not work. When I have eliminated the ways that will not work, I will find the way that will work.”
~ Edison
I'm going to share with you the attempts we made at understanding how to calculate the length, not because they worked but because I think it is a good lesson as to trying to find solutions when you don't completely understand something. (Update: And it turned out great, because Alex Caithness read this and suggested they were varints!)
First attempt: When I first saw 0x02 as the second byte of the “attribute length”, I only had examples where the first byte was 0x8# (e.g. 0x82 02, 0x87 02, etc.).
The following method works in these cases: Split the byte into two nibbles. Take the left nibble (“8”) of the byte and add a 0 (In other words 0x80). Multiply 0x80, which is 128 by 2, which is the value of the second hex corresponding to the length, resulting in 256. Finally, add the right nibble to this value.
Let's look at an actual example: Notice that 0x82 02 follows the attribute marker (0x2A).
0x80 x 0x02 = 128 x 2 = 256.
256 + 2 = 258, which is the number of bytes for the body of this message (highlighted in blue).

In all the cases I saw where the first byte was 0x8# and the second byte was 0x02, this crazy algorithm worked.
However, not every "attribute length" starts with 0x8#. As I looked through additional datasets, I realized that the first “length” byte (the byte after the attribute marker) could be anything, 0xDD, 0xFB, 0xAE… you name it!
For example, in the following screenshot, we see the attribute marker for the body, 0x2A, is followed by 0xC8 02 (magenta). We can also see that the body of this notification (highlighted in green) occupies 328 bytes (0x0148), so I had to try to find a way of calculating the length.
Second attempt: Take the left nibble of the byte and just add a 0. For example, in this case, 0xC0, which is 192 decimal. Multiply by 2, which is 384 decimal. Now… what if 0xC8 (the original first byte from the 0xC8 02 attribute length field) was a signed byte? It would decode to -56 in decimal.
384 – 56 = 328… which is exactly the number of bytes we need for the body of the notification.

I know this was way "out there" and probably just a crazy idea resulting from staring at hex numbers for too long.
These 2 methods work on a lot of cases, but neither one works on this one, for example.
The bytes corresponding to the "attribute length" are 0xF9 02 (highlighted in magenta). The body of the message is 377 bytes (highlighted in blue), or 0x01 79 in hex.

I have yet to find the right algorithm... one that works on every case, which is the reason I shared my two crazy attempts… maybe they will inspire someone and together we can figure it out.
So far, I have only seen this happen in the “Title”, “Subtitle” and “Body” attributes but please let me know if you see this anywhere else.
We have a workaround in iLEAPP to parse these longer "Body" attributes, where the second byte in the "length" field is greater than 0x01. When this happens, iLEAPP will assume the "Body" of the notification starts at the first byte AFTER the "length" field and will "sweep" all the bytes until it reaches the next attribute marker (0x30 00 42) and stop at the byte just before this marker.
****End of "Brainstorming Process"****
Encoding and Decoding Examples
I will use the four notifications listed above as examples to explain the algorithm to encode from decimal to varint and to decode from varint to decimal. It can get pretty repetitive, so feel free to skip this section once you understand the workflow.
Example #1:
Encoding (from decimal to varint)
Attribute Length: 200 bytes
- Convert from decimal to binary: 1100 1000
- Split into two 7 bit chunks (add extra 0’s if necessary): 0000001 1001000
- We add a continuation bit (“1”) to the low order group (shown in red), and a zero (shown in blue) to the other group to say there are no more bytes coming: 00000001 11001000
- Convert to hexadecimal: 0x01 C8
- Reverse bytes because of endianness: 0xC8 01
Decoding (from varint to decimal)
Attribute Length: 0xC8 01
- Reverse bytes because of endianness: 0x01 C8
- Convert to binary: 0000 0001 1100 1000
- Determine “continuation bits” and remove them:
000000011100 1000 --> 00000011001000 - Convert to decimal: 200
Example #2:
Encoding (from decimal to varint)
Attribute Length: 258 bytes
- Convert from decimal to binary: 0001 0000 0010
- Split into two 7 bit chunks: 0000010 0000010
- We add a continuation bit (“1”) to the low order group (shown in red), and a zero (shown in blue) to the other group to say there are no more bytes coming: 00000010 10000010.
- Convert to hexadecimal: 0x02 82
- Reverse bytes because of endianness: 0x82 02
Decoding (from varint to decimal)
Attribute Length: 0x 82 02
- Reverse bytes because of endianness: 0x02 82
- Convert to binary: 0000 0010 1000 0010
- Determine “continuation bits” and remove them:
000000101000 0010 --> 0000010000 0010 - Convert to decimal: 258
Example #3:
Encoding (from decimal to varint)
Attribute Length: 328 bytes
- Convert from decimal to binary: 0001 0100 1000
- Split into two 7 bit chunks: 0001 0||100 1000 --> 0000010 1001000
- We add a continuation bit (“1”) to the low order group (shown in red), and a zero (shown in blue) to the other group to say there are no more bytes coming: 00000010 11001000
- Convert to hexadecimal: 02 C8
- Reverse bytes because of endianness: C8 02
Decoding (from varint to decimal)
Attribute Length: 0xC8 02
- Reverse bytes because of endianness: 0x02 C8
- Convert to binary: 0000 0010 1100 1000
- Determine “continuation bits” and remove them:
0000001011001000 --> 00000101001000 - Convert to decimal: 328
Example #4:
Encoding (from decimal to varint)
Attribute Length: 377 bytes
- Convert from decimal to binary: 0001 0111 1001
- Split into two 7 bit chunks: 0000010 1111001
- We add a continuation bit (“1”) to the low order group (shown in red), and a zero (shown in blue) to the other group to say there are no more bytes coming: 0000 0010 1111 1001
- Convert to hexadecimal: 0x02 F9
- Reverse bytes because of endianness: 0xF9 02
Decoding (from varint to decimal)
Attribute length: 0xF9 02
- Reverse bytes because of endianness: 0x02 F9
- Convert to binary: 0000 0010 1111 1001
- Determine “continuation bits” and remove them:
0000 00101111 1001 --> 00000101111001 - Convert to decimal: 377
Notification Data Examples
It is easier to understand the structure of these records if we look at some examples:
The screenshot above is an example of 2 notifications that appear to have been “cleared”. On the top one, we see the notification size of 0x00 00 00 A3 (little endian, highlighted in green in the screenshot). The field that we assume is the notification’s “allocation status” has a value of 0x03 00 00 00 (yellow). After that, we see two dates, both with a hex value of 0x0D C4 AE 00 E5 D2 C3 41, which decode to 1/29/2022 19:16:17 UTC ("Date 1" is highlighted in blue, "Date 2" is highlighted in magenta). The next 4 bytes are 0x00 00 00 00 (gray), followed by 0x02 00 00 00 (orange). The rest of the values corresponding to this record are 0x00.
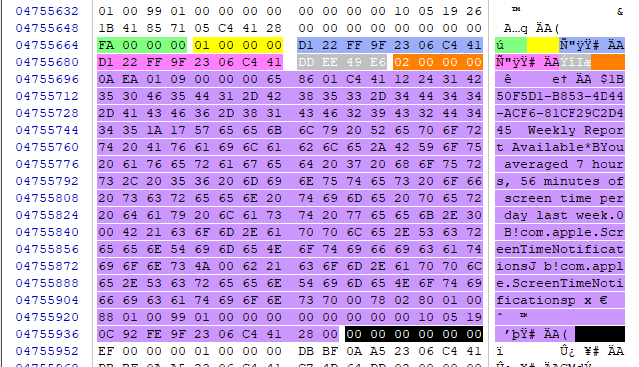
The second example is a notification of a direct message sent using the Instagram app.
The first 32 bytes, not highlighted in this screenshot, are the notification header.
The record starts with an unknown 4-byte value (0x0A 99 01 09). The next 8 bytes (highlighted in green) are what we have described as “Date 3” in this post, in this case 0x10 AB DB C1 36 06 C4 41, which decodes to 4/17/2022 15:45:07 UTC.
The next byte is 0x12 (yellow), which is the attribute marker for the “GUID”, followed by the length of the GUID, highlighted in magenta (0x24 = 36).
The next 36 bytes are the notification’s “GUID”. I was able to correlate this GUID to the GUID of an Instagram notification from knowledgeC’s Notification Usage.

Next we have 0x1A (yellow), which is the attribute marker for the Notification "Title", followed by its length (0x06 = 6). The next 6 bytes (highlighted in red but partially redacted) correspond to the notification “Title”.
We then see 0x2A, the attribute marker for the “Body” of the notification, followed by the length of the body (0x16), which in this case would be the next 22 bytes: “They said happy Easter”.
Next we see 0x30 00 42, the attribute marker for the first bundle ID, and 0x13, which is the length for this field. Sweeping the next 0x13 bytes (19 decimal), we have the bundle ID that generated the notification, which in this case is “com.burbn.instagram”.
The next attribute marker is 0x4A 00 52, which is an attribute that was not present on every notification. In this case, it says “direct”, assuming it came from a direct message or “dm” on Instagram (as opposed to a comment, for example).
Next, we see the attribute marker for the 2nd bundle ID. Note that in this case it is 0x62, but we also saw 0x40 00 62 if attribute marker 0x4A 00 52 was not present.
The 20 hex values that follow, which were highlighted in grey in the screenshot, are still unknown as to what they mean.
The meaning of the next 3 bytes are also unknown, but in all my test data they have been 0x10 ## 19 (where ## varied). In this case, ## is 0x10.
We then find what we have identified in this post as Date 4, in this case 0x23 87 1E C2 36 06 C4 41, which is 4/17/2022 at 15:45:08 UTC.
Finally, we see 0x28 01 which indicates the end of the record, like we expected from our notification length field in the header.
Note that if we count from offset 32 from the beginning of the record header (right after 0x 02 00 00 00) to the 0x01 from 0x28 01, we have 169 (0x00 00 00 A9) bytes, like the record size field indicated.
We have 7 0x00’s as padding so the next notification can starts on an 8-byte boundary.
Note that in this case, “Date 1”, “Date 2” and “Date 4” timestamp match the “Receive Recorded Date” (in the Axiom screenshot above) reported in KnowledgeC (4/17/2022 3:45:08 PM UTC). "Date 3" matches the Start/End timestamps reported in this screenshot (4/17/2022 3:45:07 PM UTC).
We can also see 3 other copies of this particular notification (with the same GUID and body but different timestamps) in the usernotificationEvents log:
One of these copies has "Date 1", "Date 2", and "Date 4" timestamps of 4/17/2022 3:45:37 PM UTC, which match the “Recorded Date” of the “Hidden” type of notification in the Axiom KnowledgeC screenshot. "Date 3" again matches the Start/End timestamps in KnowledgeC.
Another copy has "Date" 1, "Date 2", and "Date 4" timestamps of 4/17/2022 3:43:56 PM UTC. "Date 3" has a value of 4/17/2022 at 3:37:04 PM UTC. I did not find an entry in the KnowledgeC Usage Notifications that corresponds to this.
The last copy of this notification has a 'Date 1", "Date 2", and "Date 4" timestamps of 4/17/2022 3:56:51 PM UTC. "Date 3" has a value of 4/17/2022 3:45:07 PM UTC. These match the Recorded Date and Start-End Date/Time for the “IndirectClear” type of notification from KnowledgeC.
It may be possible that "Date 1", "2", and "4" refer (in general) to the “Recorded Date”, and "Date 3" to the Start/End time of the Usage Notification entry in KnowledgeC, but additional research is necessary to corroborate this. Furthermore, it is important to remember that you may have notifications that are in the usernotificationEvents log that are no longer in KnowledgeC, due to the short “shelf-life” of the latter.
I don’t want to sound like a broken record and go over every byte again, so I will just mention any interesting differences found in the next few examples:

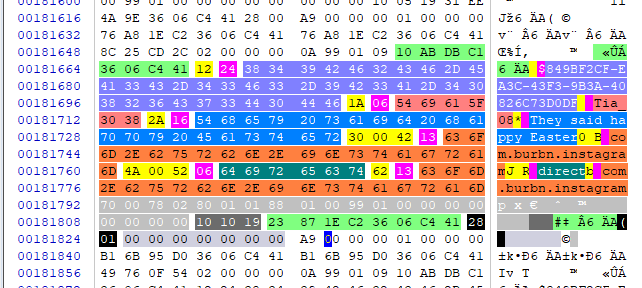
This screenshot is an example of a message sent using the native Messages app.
The bundle ID for this notification is com.apple.MobileSMS, which is the bundle ID associated with the native iOS Messaging app. (highlighted in orange in the screenshot)
Attribute marker 0x4A 00 52 (highlighted in teal) shows an email address, presumably the Apple ID used to send that message. We also see attribute marker 0x6A. I noticed this UUID contains the “ABPerson” string, which I recognized from the Address Book database.
We also see attribute marker 0xA2 01 (highlighted in pink), which appears to be the Apple ID of the person that sent the message.

This notification is associated with Siri. There are no new attribute markers that I hadn't discussed yet in this record, I just wanted to show a different type of notification.

This notification does not have a "Body" field. We can see that it goes from the "Title" (attribute marker 0x1A), which is "Snoozing", to attribute marker 0x30 00 42, which is the "1st Bundle ID" (com.apple.mobiletimer).
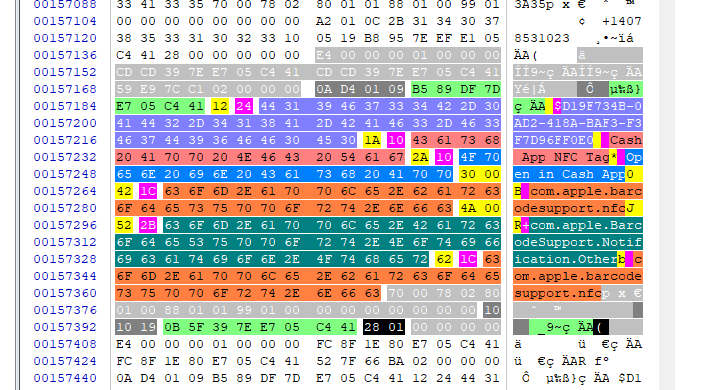
This last example is an NFC Tag notification alert for Cash App.
"Date 1", "Date 2", "Date 4": 4/17/2022 4:28:44 PM UTC match the Recorded Date for the "Received" KnowledgeC notification parsed by Axiom in the screenshot below.
"Date 3": 4/17/2022 4:28:43 PM UTC matches the start and end.
There is a second notification in this log with the same GUID. The timestamps are as follow:
"Date 1"and "Date 2": 4/17/2022 4:28:48 PM UTC
"Date 3": 4/17/2022 4:31:44 PM UTC
"Date 4": 4/17/2022 4:32:24
"Date 1" and "Date 2" match the Recorded Date for the "Dismiss" knowledgeC Notification event.

iLEAPP
If you have made it this far and you are still awake, I am very impressed. Now, for the good news! You don’t have to manually parse these files (unless you are really bored). Alexis Brignoni (@AlexisBrignoni) was amazing enough to add this artifact to iLEAPP. If you haven’t used iLEAPP crawl out from under your rock and go download it, because you could be missing so much data in your cases! Also you can’t beat the price (FREE!!!). Note: As of the date I released this post, none of the commercial forensic tools parse this.
One of my favorite features (aside from being SUPER fast) is that Alexis incorporated a script from Alex Caithness (@kviddy) that parses the emoji’s, and it looks so fancy! Here is this beauty of a code, in case you want to use it (don’t forget to give him credit!).
The following screenshot shows the iLEAPP module you need to select to parse iOS User Notification Events. (To be honest, you can select all the modules and it would still be super fast!)


These logs are very complex, and due to the limited amount of test data I had available, I may not have been able to capture every possible detail of these files. Please, be kind, I just wanted to share what I had found so far with the community. I have mentioned several times in this post, this is an ongoing research which I plan to update regularly, so the second purpose of this post is that if you find a different “attribute” type or if you have sample files that you can share with me, please do, so we can keep making a great artifact even better, and most important, seeking the truth and growing together as a community.
As usual, thank you for your time!
Special thanks to:
Alexis Brignoni (Twitter: @AlexisBrignoni; Instagram: 4n6_abrignoni) for working with me on this project and listening to my crazy ideas.
Dan Ogden, for peer reviewing this post.